
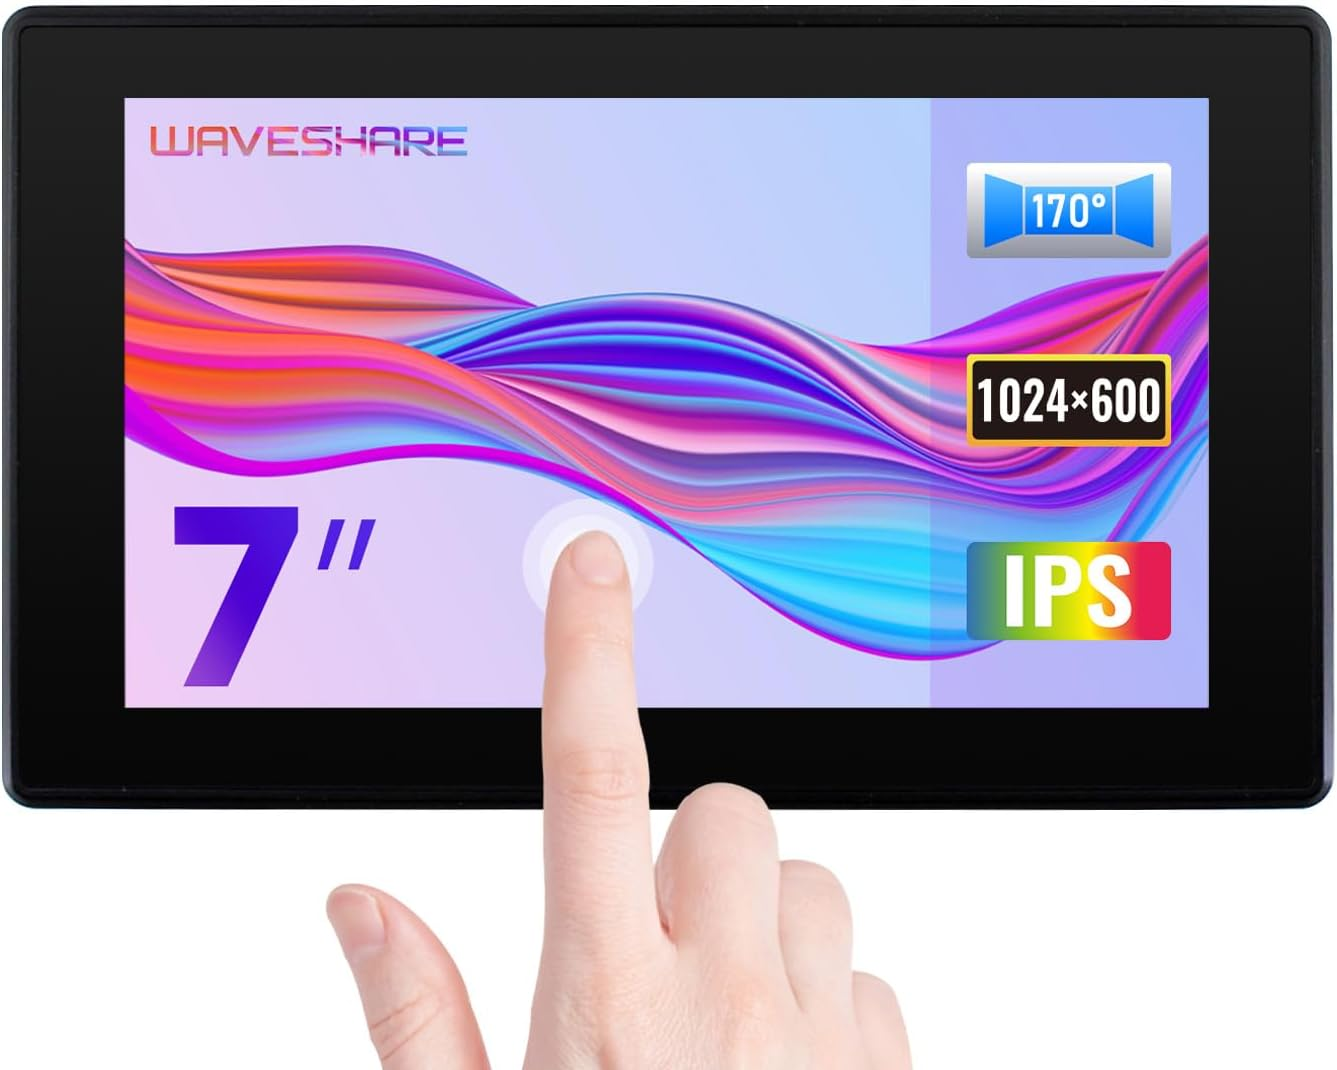
- 7inch IPS screen,1024×600 hardware resolution, configurable by software (up to 1920×1080) Toughened glass capacitive touch panel, up to 6H hardness
- Supports popular mini PCs such as Raspberry Pi, Jetson Nano, as well as general desktop computers
- When works with Raspberry Pi, supports Raspberry Pi OS/Ubuntu/Kali/Retropie/WIN10 IOT, driver free; When work Windows PC, supports Windows 11 / 10 / 8.1 / 8 / 7, 5-points touch; When works with Jetson Nano, supports Ubuntu, single point touch, driver free.
- Multi-languages OSD menu, for power management, brightness/contrast adjustment, etc.
- With 3.5mm audio jack, supports HDMI audio output; Also supports VGA input (specific cable is required and should be purchased separately); With PC case, optional tilt angle: 30°/50°. (case version only)
Product Description
Same screen on another listing, (amazon.com.au/dp/B09MM28ZFB?ref=myi_title_dp) Sometimes there will be stocks shipped by Amazon
7inch Capacitive Touch Screen LCD (H) With Case And Toughened Glass Cover, 1024×600, HDMI, IPS, Various Devices & Systems Support
- 7inch IPS screen, 1024×600 hardware resolution, configurable by software. (up to 1920×1080)
- Toughened glass capacitive touch panel, 6H hardness. (case version only)
- Supports popular mini PC such as Raspberry Pi, BB Black, Banana Pi.
- Used with Raspberry Pi, supports Raspbian, Ubuntu, WIN 10 IoT, driver free.
- Multi-languages OSD menu, for power management, brightness/contrast adjustment, etc.
- It has a 3.5mm audio jack and supports HDMI audio output
- Supports VGA input (specific cable is required and should be purchase separately)
- High-quality PC case, optional tilt angle: 30°/50°.
Working with PC
This product supports Windows 10/8.1/8/7 OS.:
1. Connect the TOUCH interface of LCD to the USB interface of PC. Wait for a while, the windows will automatically recognize the touch function.
2. If you use HDMI, you need to connect the HDMI interface of LCD to the HDMI port of PC. About 5s later, you can see the LCD display properly. If you need the audio, you can insert a 3.5mm earphones to HP ports.
3. Use VGA, you need to connect the VGA interface of LCD to PC’s VGA ports by Mini HDMI to VGA Cable.
Note:
1) When the computer is connected to several different displays at the same time, only this LCD can be used to control the cursor on the main display, so we recommended to set this LCD as the main display.
2) Some of PC cannot support HDMI screen Hot Plug. In this case, restart the PC can solve.
3) Sometimes LCD will flicker because of undersupplying from USB cable of PC. You need to connect an external power supply (5V/2A) to DC port.
4) HP audio output only works while using HDMI communication
5) Mini HDMI to VGA Cable is necessary and need to be purchased separately if you use VGA communication.
Usage Instruction: waveshare.com/wiki/7inch_HDMI_LCD_(H)_(with_case)?Amazon
Working with Raspberry Pi-Supports Raspbian/Ubuntu mate/Windows 10 IoT Core
When working with Raspberry Pi, you should set the resolution of the LCD by yourself, otherwise, the LCD screen will not work. For more detailed information, please read the following section.
Please download the latest version of the image on the Raspberry Pi official website.
1) Download the compressed file to the PC, and unzip it to get the .img file.
2) Connect the TF card to the PC, use SDFormatter.exe software to format the TF card.
3) Open the Win32DiskImager.exe software, select the system image downloaded in step 1, and click‘Write’ to write the system image.
4) After the image has finished writing, open the config.txt file in the root directory of the TF card, and comment out dtoverlay=vc4-fkms-V3D.
5) Add the following code at the end of config.txt, then save and quit the TF card safely.
max_usb_current=1
hdmi_force_hotplug=1
config_hdmi_boost=10
hdmi_group=2
hdmi_mode=87
hdmi_cvt 1024 600 60 6 0 0 0
If you use the LCD with Raspberry Pi 4B, you need to remove line dtoverlay=vc4-fkms-V3D from config.txt file
You must make sure that there are no spaces on either side of the equal sign.
Working with Jetson Nano
To work with Jetson Nano Developer Kit, you don’t need to make software configuration.
1) Connect the TOUCH interface of the LCD to the USB interface of Jetson Nano.
2) Connect the HDMI interface of the LCD to the HDMI interface of the Jetson Nano and then power on the Jetson Nano. After about 5 seconds, you can see the LCD display normally. If you need to output sound, you can insert a 3.5mm earphones to the HP audio output interface.
Note:
1) If the LCD flickers, it may be due to insufficient power supply of the Jetson Nano’s USB interface. It can be solved normally after connecting to an external 5V/2A power supply through the DC interface of the LCD.
2) When the HP audio interface is in use, it may be necessary to set the sound output settings in the system.
Connection Examples
Working With Raspberry PiSupports Raspbian, 5-points touch, driver free Supports Ubuntu / Kali / WIN10 IoT, single point touch, driver free Supports Retropie, driver free | Working With Raspberry Pi Zero WYou need to prepare additional mini HDMI adapter and USB cable. | Working With AI Computer Jetson NanoSupports Ubuntu, single point touch, driver free | Working With Mini PCSupports Windows 11 / 10 / 8.1 / 8 / 7, 5-points touch, driver free |
Appearance
Note:
- Resolution of Ubuntu Mate OS or Windows 10 IoT Core OS can also be set properly by editing config.txt.
- For Pi Zero / Zero W: if you’ve used an SD card on a Pi 3 and then attached the card to the Pi Zero, the touch screen often doesn’t work. In such cases, you have to write a fresh system image to the SD card. The first boot up must be done on the Pi Zero but not Pi 3, due to initialization for a corresponding device.
Services & Product Certification
Resources & ServicesDetailed Menu and Learning More: waveshare.com/wiki/7inch_HDMI_LCD_(H)_(with_case)?Amazon | HDMI Certified*We are an official authorized HDMI Adopter. | CE CertifiedThis display is in compliance with CE standard. |
Reviews
There are no reviews yet.